

TSG42. Inside the Mind of an Urban Sketcher: A Chat with Linda Toolsema
TSG42. Inside the Mind of an Urban Sketcher: A Chat with Linda Toolsema
From streets to sketchbooks

Dear Sketchbookers,
It is my pleasure to introduce this post made by my friend Linda Toolsema (check her art here), who will share her unique approach to Urban Sketching. Linda is the perfect person to write about this topic, as she has been an urban sketcher for quite some time. She organizes local sketching outings, has attended the Urban Sketchers International Symposiums, and creates drawings that are truly jaw-dropping. I had the fortune of meeting her through drawing and painting sessions hosted by another artist (see below), and we try to meet online once a week to chat and make art together.
For this interview, I asked Linda to provide her bio and answer some questions. Instead of a traditional Q&A format, she has thoughtfully split her responses into sections to give us a richer perspective on her urban sketching journey. Here is what she wrote:
I’m an urban sketcher and sketchbook artist based near Groningen in the Netherlands. I draw and paint in a wide range of media and styles, but almost exclusively in books. These include messy mixed media sketchbooks used in the studio, as well as portable sketchbooks for sketching on location with relatively ‘clean’ materials (usually pen and watercolours). Sketching on location is even more fun with a group, so I am active in Urban Sketchers Netherlands and co-organizer of Urban Sketchers Groningen. At home, I also enjoy drawing from photos and sketching with friends online. That is also how Citla and I met - through Emma Carlisle’s Patreon.
Urban sketching
Urban sketching can be a bit tricky to define, as it means different things to different people. Going back to the source, the International Urban Sketchers organization gives this definition: “An urban sketch is a drawing created on location, indoors or out, capturing what the sketcher sees from direct observation. Urban sketchers use any kind of media to tell the story of their surroundings, the places they live, and where they travel.” The main idea is to draw from observation and to capture the essence of the moment and place. So, a sketch of a single lamp post without context is not an urban sketch, but when you add the bike that is parked against it and an impression of the building behind it, it is.
Sometimes it is hard to decide whether or not something is an urban sketch. For example, I once heard a famous urban sketcher explain that a sketch without people in it is not an urban sketch. He argued that you should not only capture the place, but also the moment, and that means that people are passing and should be included. It turned out that he lives in a busy US city, but I live in the countryside, and if I sketch outside for an hour it might just happen that nobody passes by… Fortunately ‘urban sketching’ does not necessarily mean that you have to sketch in the city, it is all about sketching on location. Perhaps in my ‘rural’ sketches, I capture the moment differently, for example by sketching flowers blooming.
This can still raise questions. Do you have to draw everything you see? Are you allowed to leave out an ugly traffic sign, or move a tree if it’s in your way? Can you finish your sketch somewhere else, for example drawing on location but adding colour at home? As always, there are purist and more pragmatic opinions. If you want to post your sketch in an Urban Sketchers Facebook group (especially the bigger ones), it is good to keep this in mind and not deviate too much. But what you do in your sketchbook is your own business, and you can do anything you want! To me, what matters is that I’m drawing on location, from observation. I enjoy capturing the specific part of the location that speaks to me at a personal level, in some way or another. If I see a particularly beautiful door I might sketch it without context. If I find a traffic sign particularly annoying, I may leave it out. If it starts to rain or I am with my family and they want to move on, I will finish my sketch later. I am doing this as my hobby, so I do it in a way that is fun for me.
Sketching gear
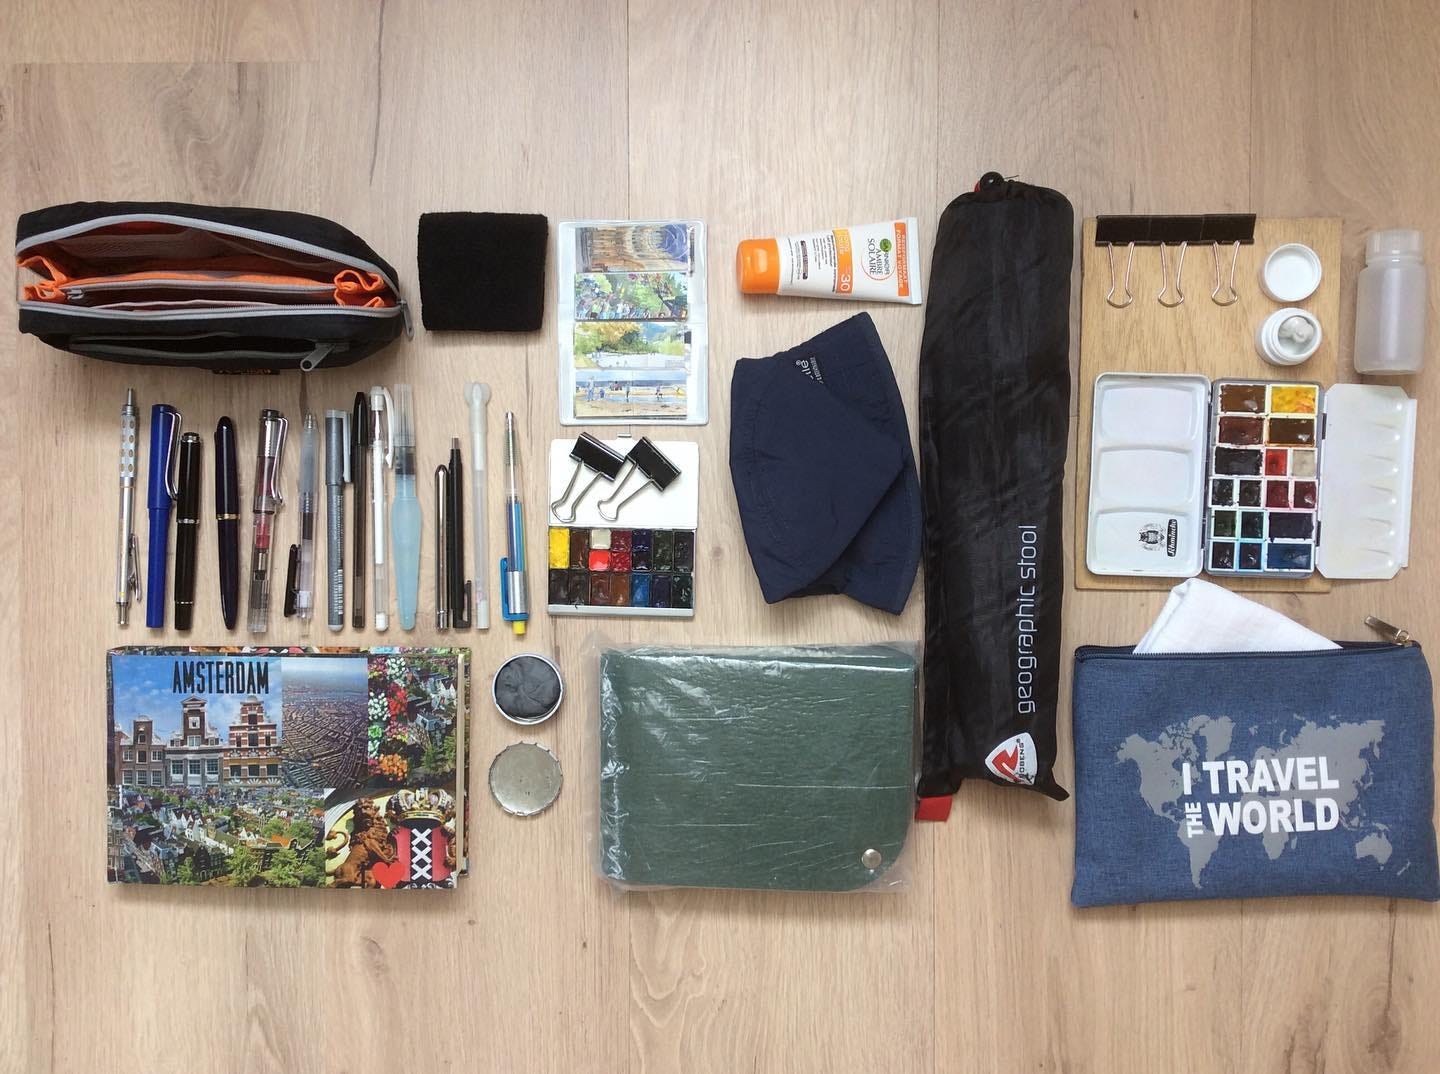
To explain my personal approach to urban sketching, let’s start at the beginning. Every sketch outing starts with packing. Whether or not I am going out with the specific purpose of sketching, what I can do on location obviously depends on the materials I have with me. In my everyday bag, I carry a small (A6) sketchbook and a small pencil case with a pencil, a few pens, a teeny tiny watercolour set and a water brush. My dedicated urban sketching kit is a slightly bigger version of that: medium-sized (A5) sketchbook, a few more pens or pencils, a travel brush and a somewhat bigger watercolour set.
Occasionally, I bring other materials that I enjoy using at home, such as coloured pencils, crayons or Tombow markers. So far, however, they don’t really seem to work for me on location. First, as I like to capture whatever it is that speaks to me on location, I like to use actual realistic colours. With a good selection of watercolours I can (more or less) mix any colour I want. But with pencils or markers, I have to bring quite a big selection to be happy with it on location. Second, I have learned over the years that I like to travel relatively light. This is partly for health reasons (I have ME/CFS, so limited energy) and partly to be able to pack up quickly and easily when I need to move.
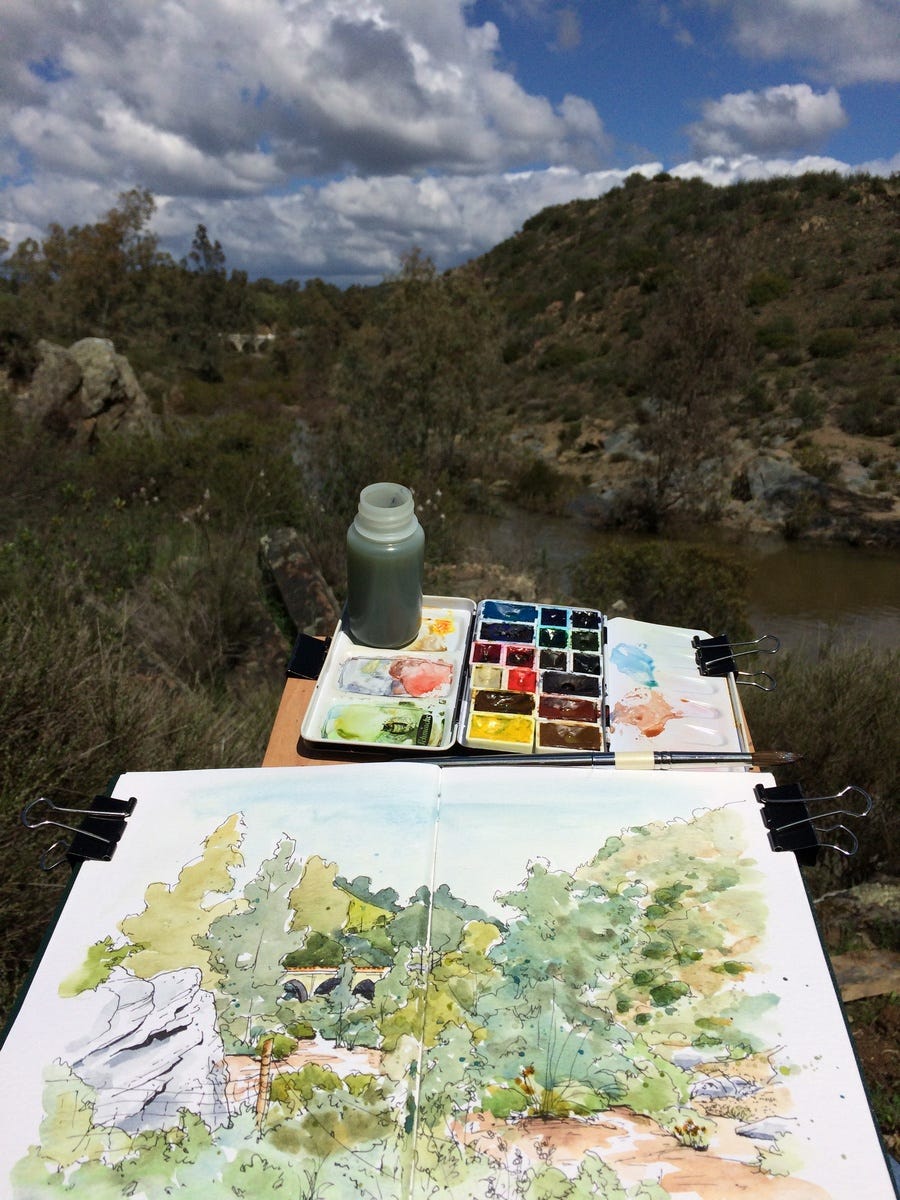
Apart from the sketching materials themselves I bring a few other things. A small foldable stool or sitting mat from the outdoor store allows me to sit (relatively) comfortable wherever I like. Also, I always check on what I think of as my ‘weather supplies’. In summer, it is usually a sun hat and sunscreen, in winter it’s fingerless gloves, and an umbrella when needed. Furthermore, I have some additions to the sketch kit that make sketching outside more convenient, all of them inspired by Australian urban sketcher Liz Steel. The first is to use a wrist sweatband (or a sock with the toes cut off) around your wrist to wipe off your brush. Second, I have a piece of plywood approximately the size of my sketchbook that I can clip my book as well as my palette onto. Then I use a bit of poster buddy (also known as Blu Tack) to stick my water bottle to my palette and I can hold everything with one hand (see photo).
Watercolour palette
Every now and then I change the colours in my watercolour palette. It is hard to find the perfect selection, and also I enjoy experimenting. A set that I have used for many years, and is close to perfect to me, is Jane Blundell’s ‘Ultimate mixing palette’ (without the Indian red, and with a dark blue and a convenience green like sap green). This allows you to mix any colour you want, even though that may take a bit of practice. It is perfect for when you want to paint realistic colours. Another favourite is a small 12-colour palette taken from Felix Scheinberger, who occasionally shares his colours on social media. This palette has more bright, fun colours, and is more suitable for illustration.
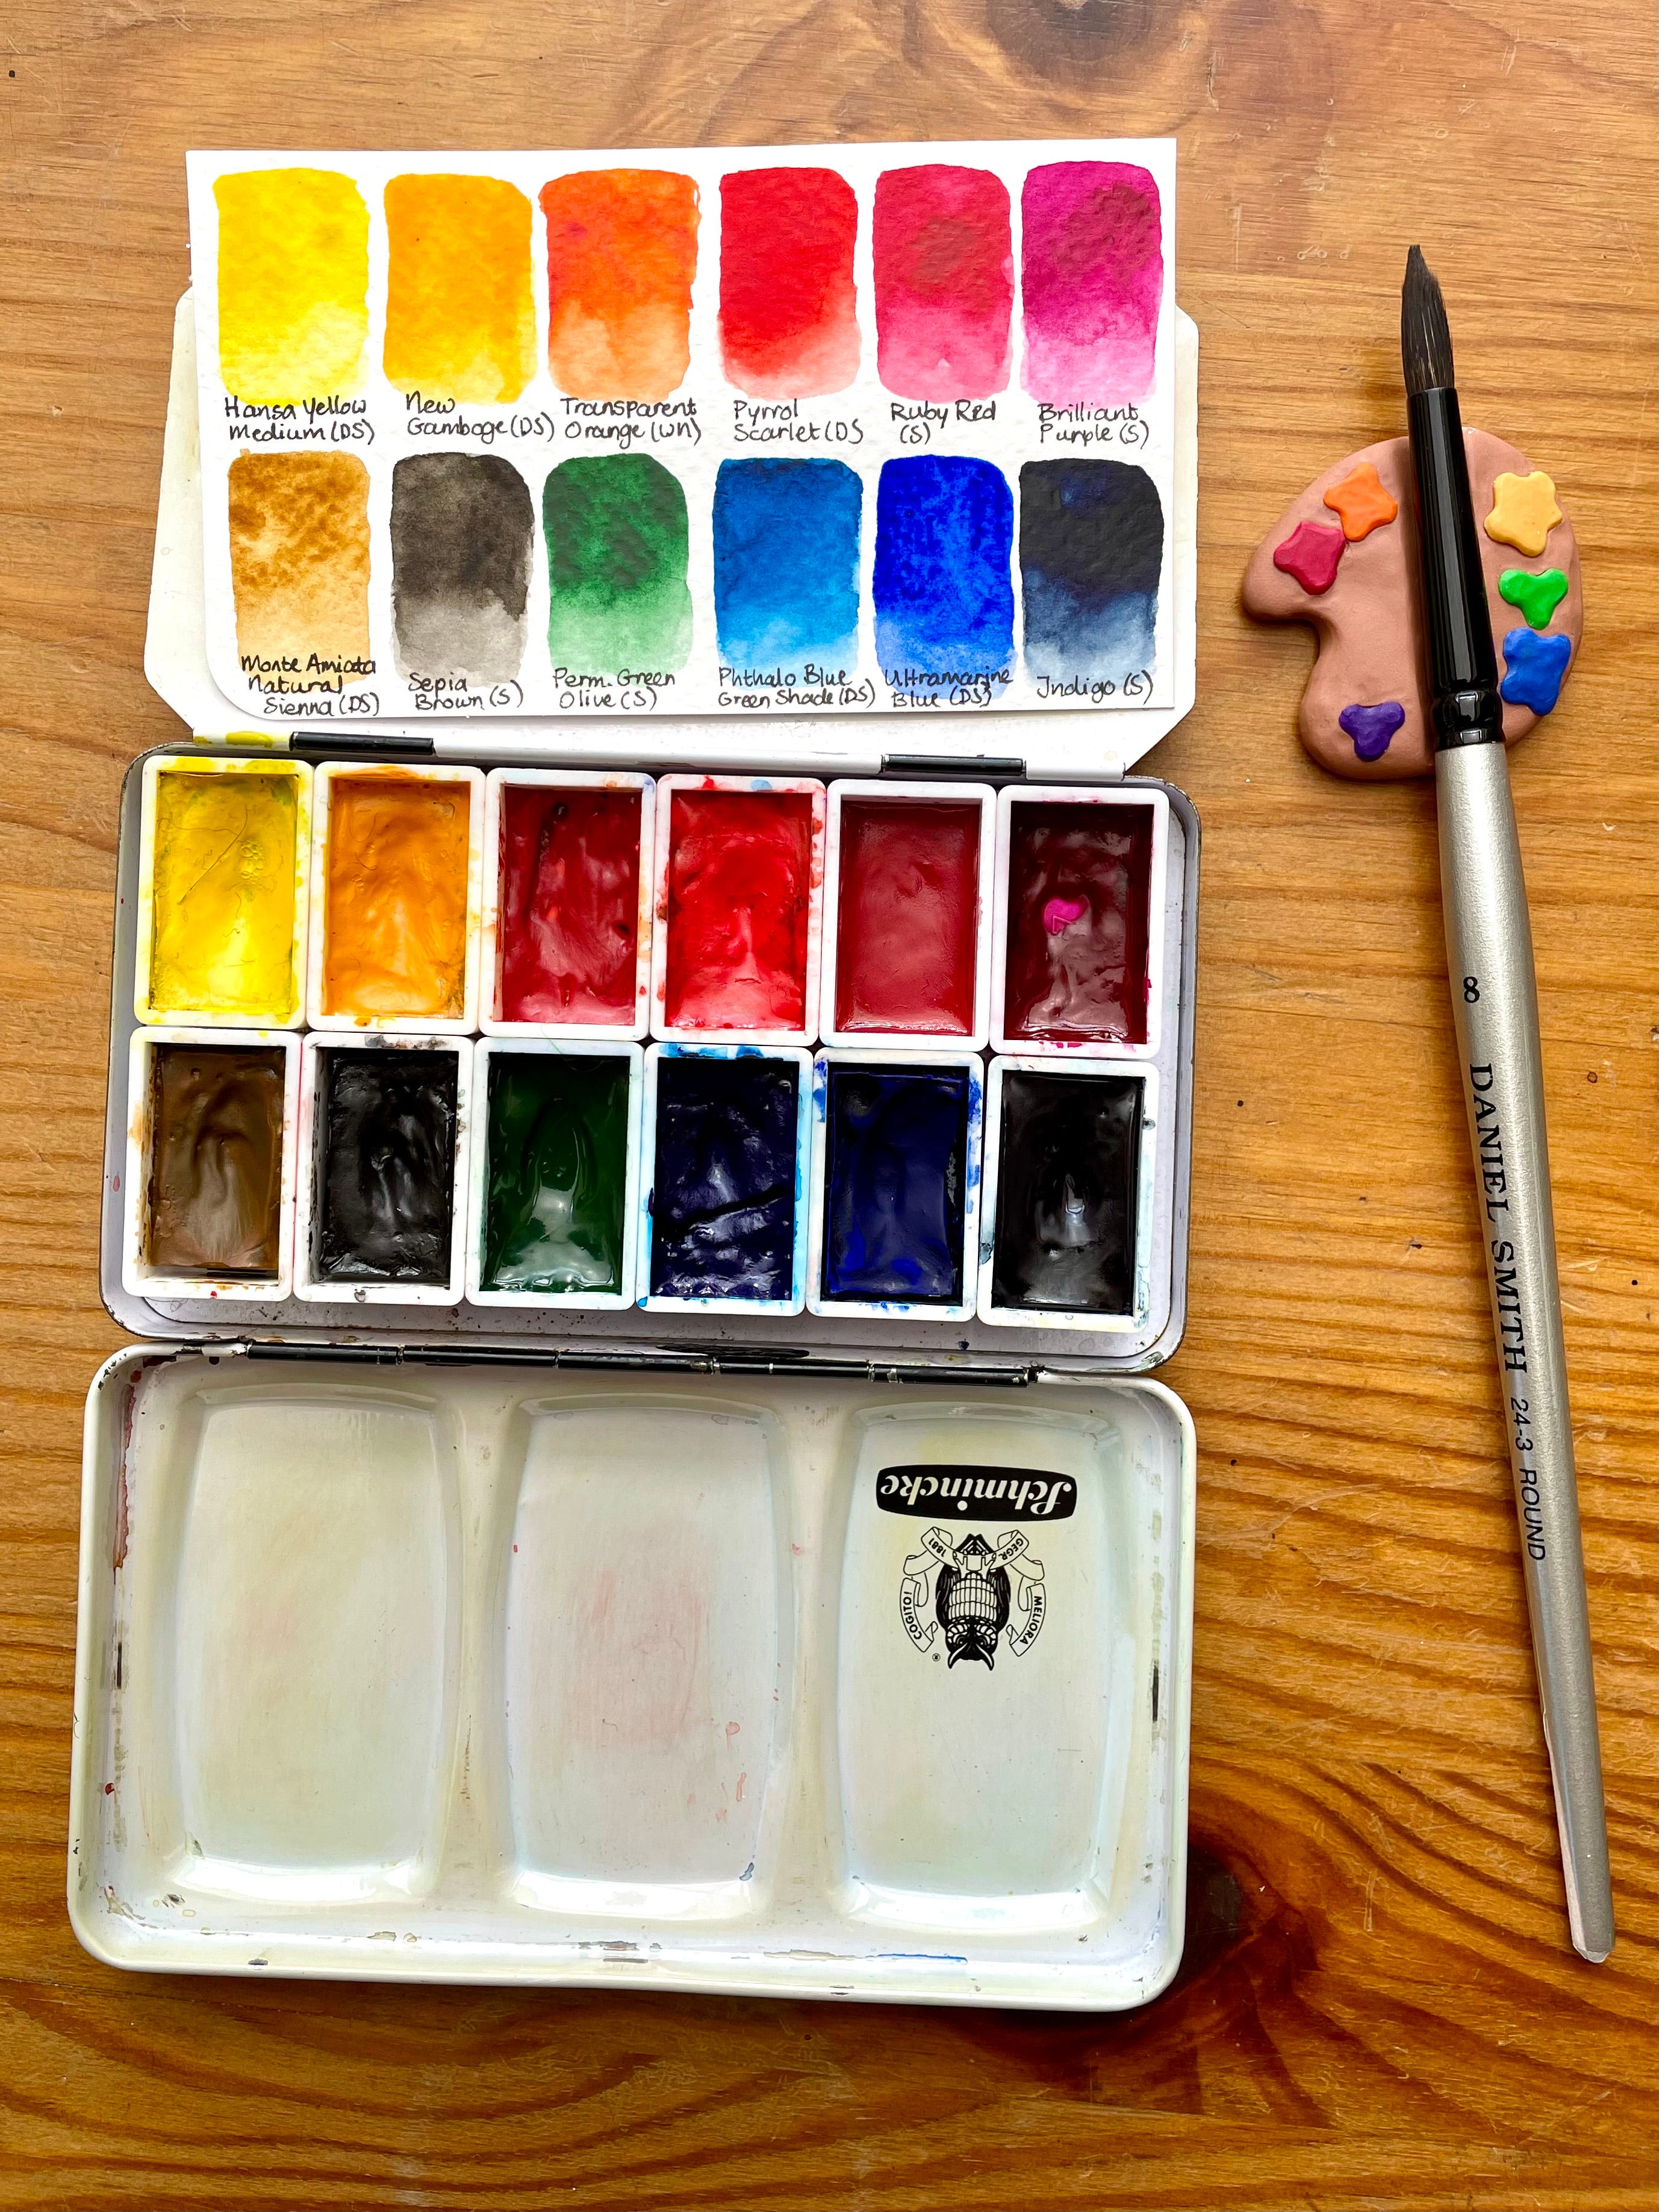
Recently, I put together my palette of 12 colours according to a system that works well for me: warm and cool versions of the primary colours (yellow, red and blue); the three secondary colours (orange, pink and green); warm and cool darks (dark brown and dark blue); plus an ochre. A tip: many standard sets don’t contain a pink, because as a secondary colour you should, in theory, be able to mix it. In practice, that doesn’t work. I have two daughters who were young when I started urban sketching, so I really needed a pink. I still have it in every palette. You never know when you want to paint a pink or purple flower or bicycle! A bit of pink also works nicely in caucasian skin tones.
For each colour, I picked a favourite, but also kept in mind how they go together. Here is the list:
Warm yellow: New gamboge (Daniel Smith)
Cool yellow: Hansa yellow medium (Daniel Smith)
Warm red: Pyrrol scarlet (Daniel Smith)
Cool red: Ruby red (Schmincke)
Warm blue: Ultramarine blue (Daniel Smith)
Cool blue: Phthalo blue green shade (Daniel Smith)
Orange: Transparent orange (Winsor & Newton)
Pink: Brilliant purple (Schmincke)
Green: Permanent green olive (Schmincke)
Warm dark: Sepia brown (Schmincke)
Cool dark: Indigo (Schmincke)
Ochre: Monte Amiata Natural Sienna (Daniel Smith)
Please note that you don’t need these specific colours or brands if you want to try this! Go for the system, not my personal choices. Having said that, I do recommend these brands, or in general artist quality paints. They are just so much better, especially if you like intense colours or darks. If you don’t use them straight from the tube but use a dry palette instead (which is my personal preference) they last a long time. If those are not in your budget, look for student-grade paints with good reviews - some are pretty close to the artist grade.
This palette is not my favourite for mixing browns, but I am trying to stay away from too much brown anyway. I find that my sketches can become dull if trying to approach realistic colours means that I include lots of browns and greys (of course those can be beautiful in a good painting, but less so in my pen and wash sketches). But this setup works really well for more colourful, ‘happy paintings’. It allows for mixing and adding contrast (darks). Limiting myself to just 12 colours also means that I know my colours well and don’t need to search to find the perfect one. I love having more options at home in my studio, but on location this is so much easier.
Sketching routine
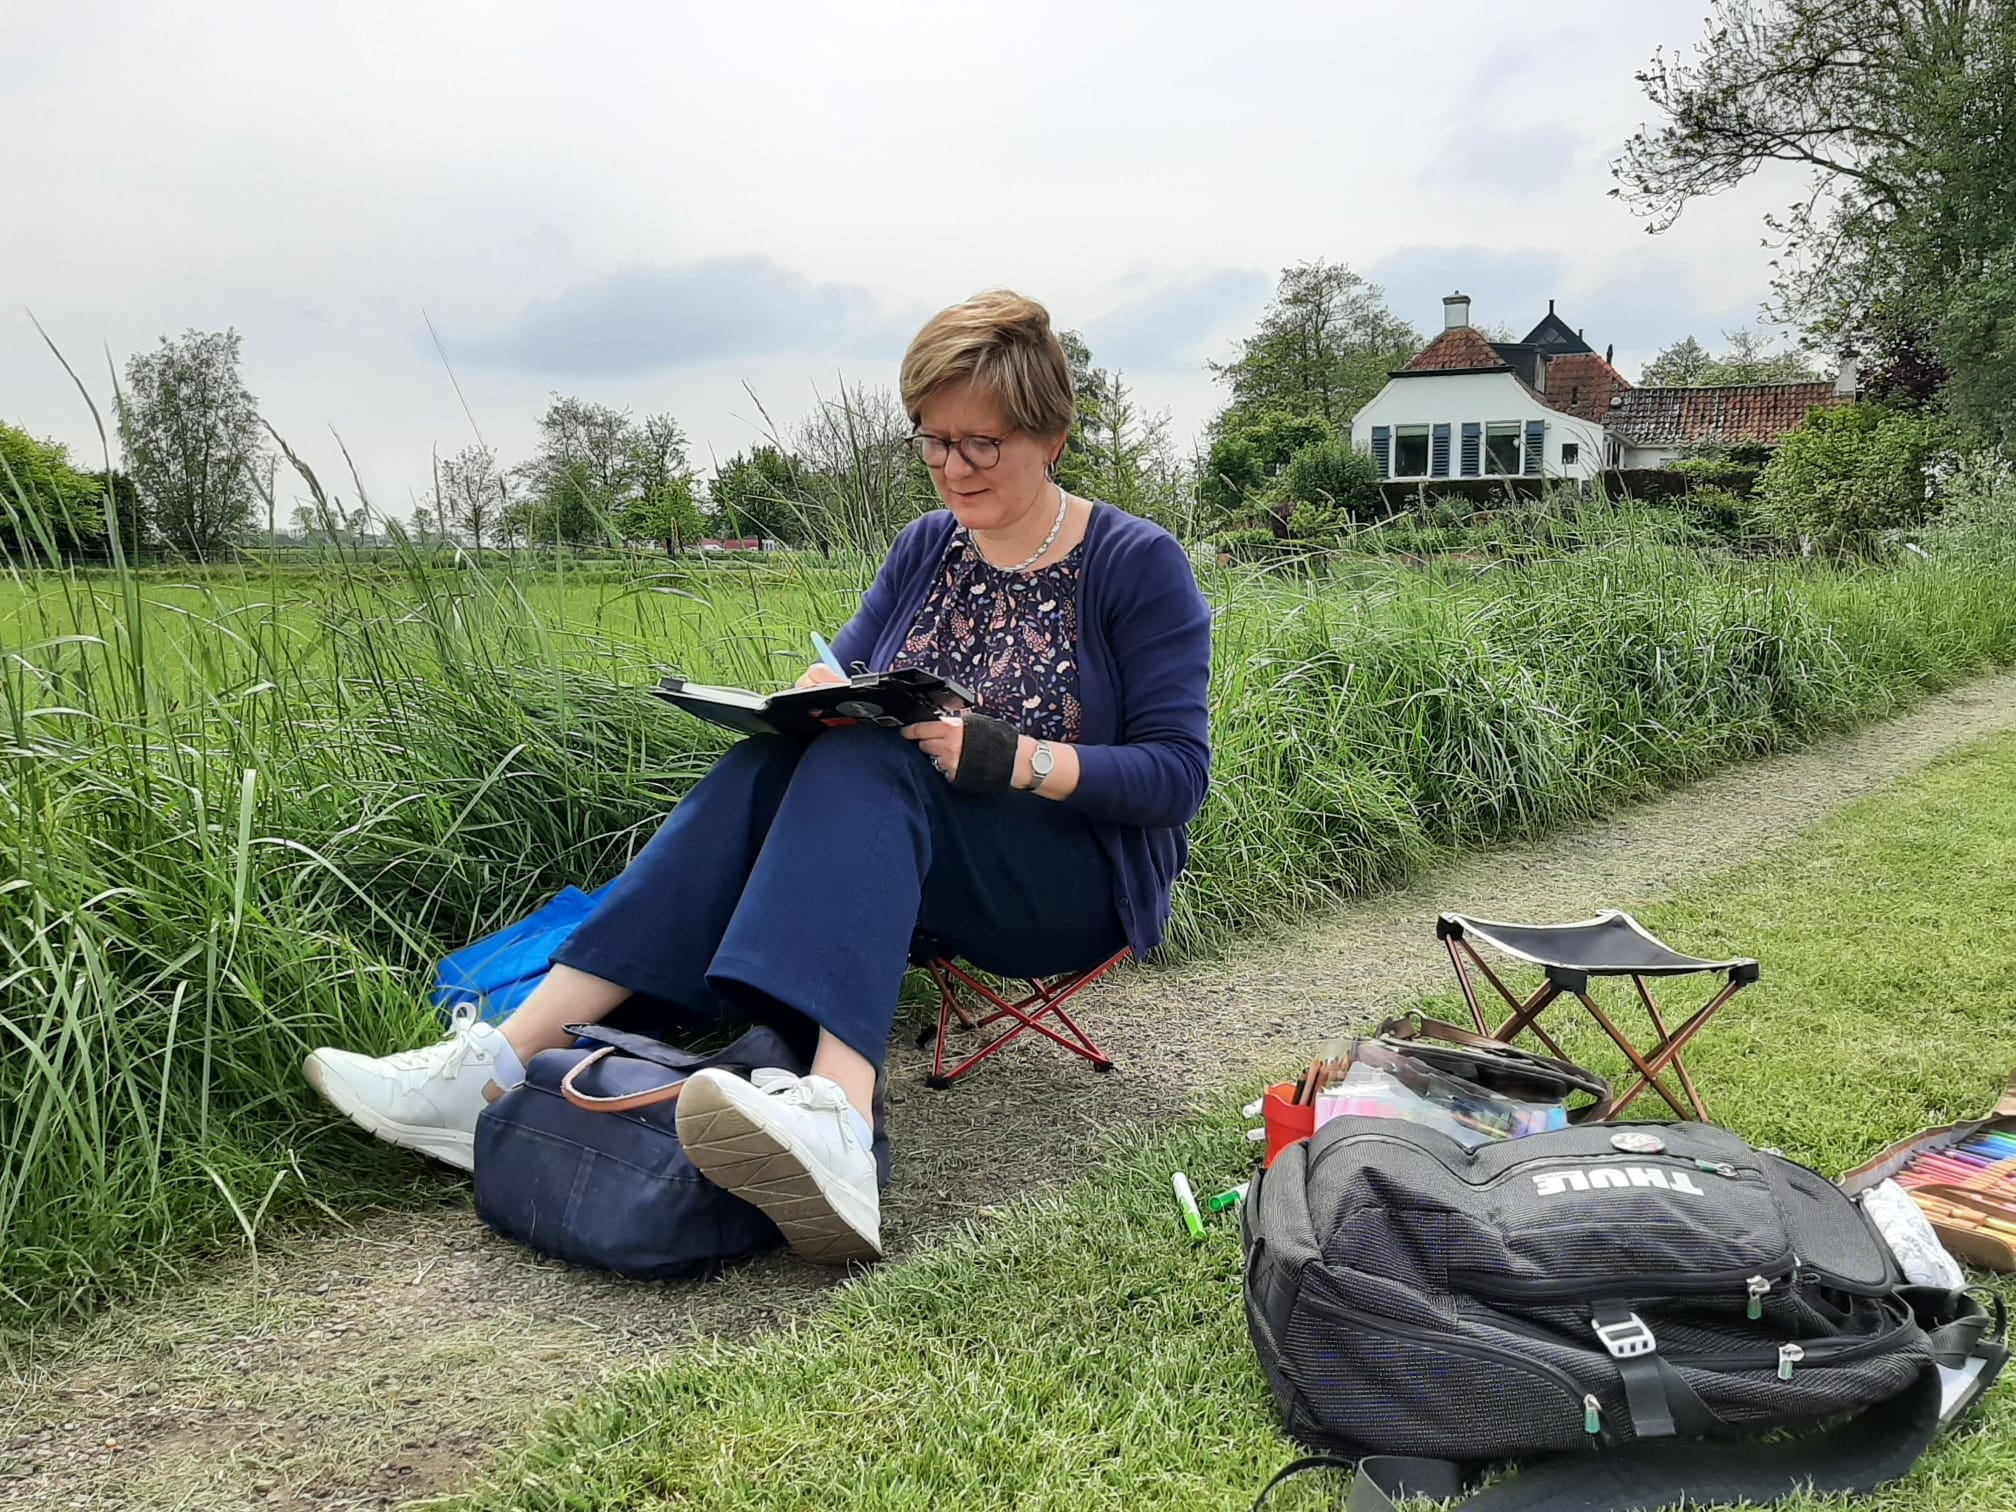
Citla asked about my sketching routine, and for example how to find the perfect spot to sketch. This question is hard to answer, because it is not something that I really think about. I used to find it hard to pick a spot. Some sketchers enjoy skipping the touristy places and prefer subjects like back alleys with dumpsters. I can see their point, but I am - like most tourists - drawn mostly to the pretty places, and especially to old buildings. In a place with many beautiful sights it can be hard to pick one, and in the past, I could take a long time to choose. Over time I’ve learnt to notice what attracts me personally and start drawing that. This can be anything, from elaborate stone carving to a pretty colour on the window shutters. I know that if it speaks to me in real life, I will enjoy capturing it as well as seeing it back in my sketchbook later. My only problem is that I am often attracted to the atmosphere of a place, and catch myself drawing the entire scene. Soon after starting the sketch I will regret that choice, because I’m making it hard for myself, drawing several buildings instead of just one or two. But when the sketch works out I’m perfectly happy.
In practice, it may not always be practical to sketch that favourite view. I find it hard to sketch while standing, so I have to find a place where I can sit comfortably. If I bring my little stool I am a bit more flexible, otherwise I may find a bench, a staircase or a wall. If it is sunny or rainy I may have to find shelter. This may influence my view and my sketch, and that is okay. It is all part of the story of that particular moment.
Once I have found a spot, I sit down with my backpack open next to me. I like to keep my supplies in the open bag as much as possible so that I can get up and out of the way quickly if I have to. I often start with a few light pencil lines, just to get the main shapes down and check whether everything fits on the page. I know it can be useful to do thumbnails first, but I never do. I suppose my pencil lines have a similar function. Very soon, I move on to drawing with pen - I don’t enjoy tracing so I don’t want to draw too much in pencil.
How to finish a sketch
I used to add colour only after finishing all the linework, if there was enough time. Recently I have been enjoying the opposite approach: throwing some messy watercolour paint blobs and splatters down before drawing. This takes the pressure off, and also helps to obtain a more loose and fun style. After doing the linework, I can add a bit more colour, especially in the shadows and darkest places. I often keep adding more and more paint at the end, but I like my pen sketches best with limited colour. I’m still learning when to stop!
So, depending on the approach I am taking, there are different ways to finish a sketch. This is especially important to me when my sketch looks a bit boring. Perhaps I didn’t have much time and did a simple drawing, or it just didn’t turn out as pretty as I had hoped. Personally, I don’t like to leave unfinished sketches in my sketchbooks. Some sketchers abandon their drawings when they don’t enjoy them anymore, or when they’ve had a false start. Of course that is perfectly fine. For some reason, however, I have developed a habit of finishing my sketches, even if I don’t like them very much.
There are a few tricks I use to make a boring drawing more interesting. If I use watercolour in the sketch without completely painting everything, I love to add some splatter. This gives a nice loose touch that can complement a more detailed and precise line drawing. Another approach that works particularly well when I am not using colour, is to introduce line variation. I love drawing with my Sailor fude pen, a fountain pen with a bent nib that makes a thin line when I hold it more upright and a thicker line when held at an angle. I really like a bit of contrast in my drawings and enjoy putting in the ‘darkest darks’ at the end, either with paint or with the pen. A bit of hatching can be nice too. Finally, especially with quick, simple drawings I like to enhance the page by adding other elements like text or collage. I almost always write the location and the date on my urban sketches as a memory for later, but when the page needs a bit more I like to add more text with nice lettering, copy the logo of a cafe or museum, or collage in tickets and receipts. This is especially fun when traveling. And finally, just turn the page and start the next drawing!
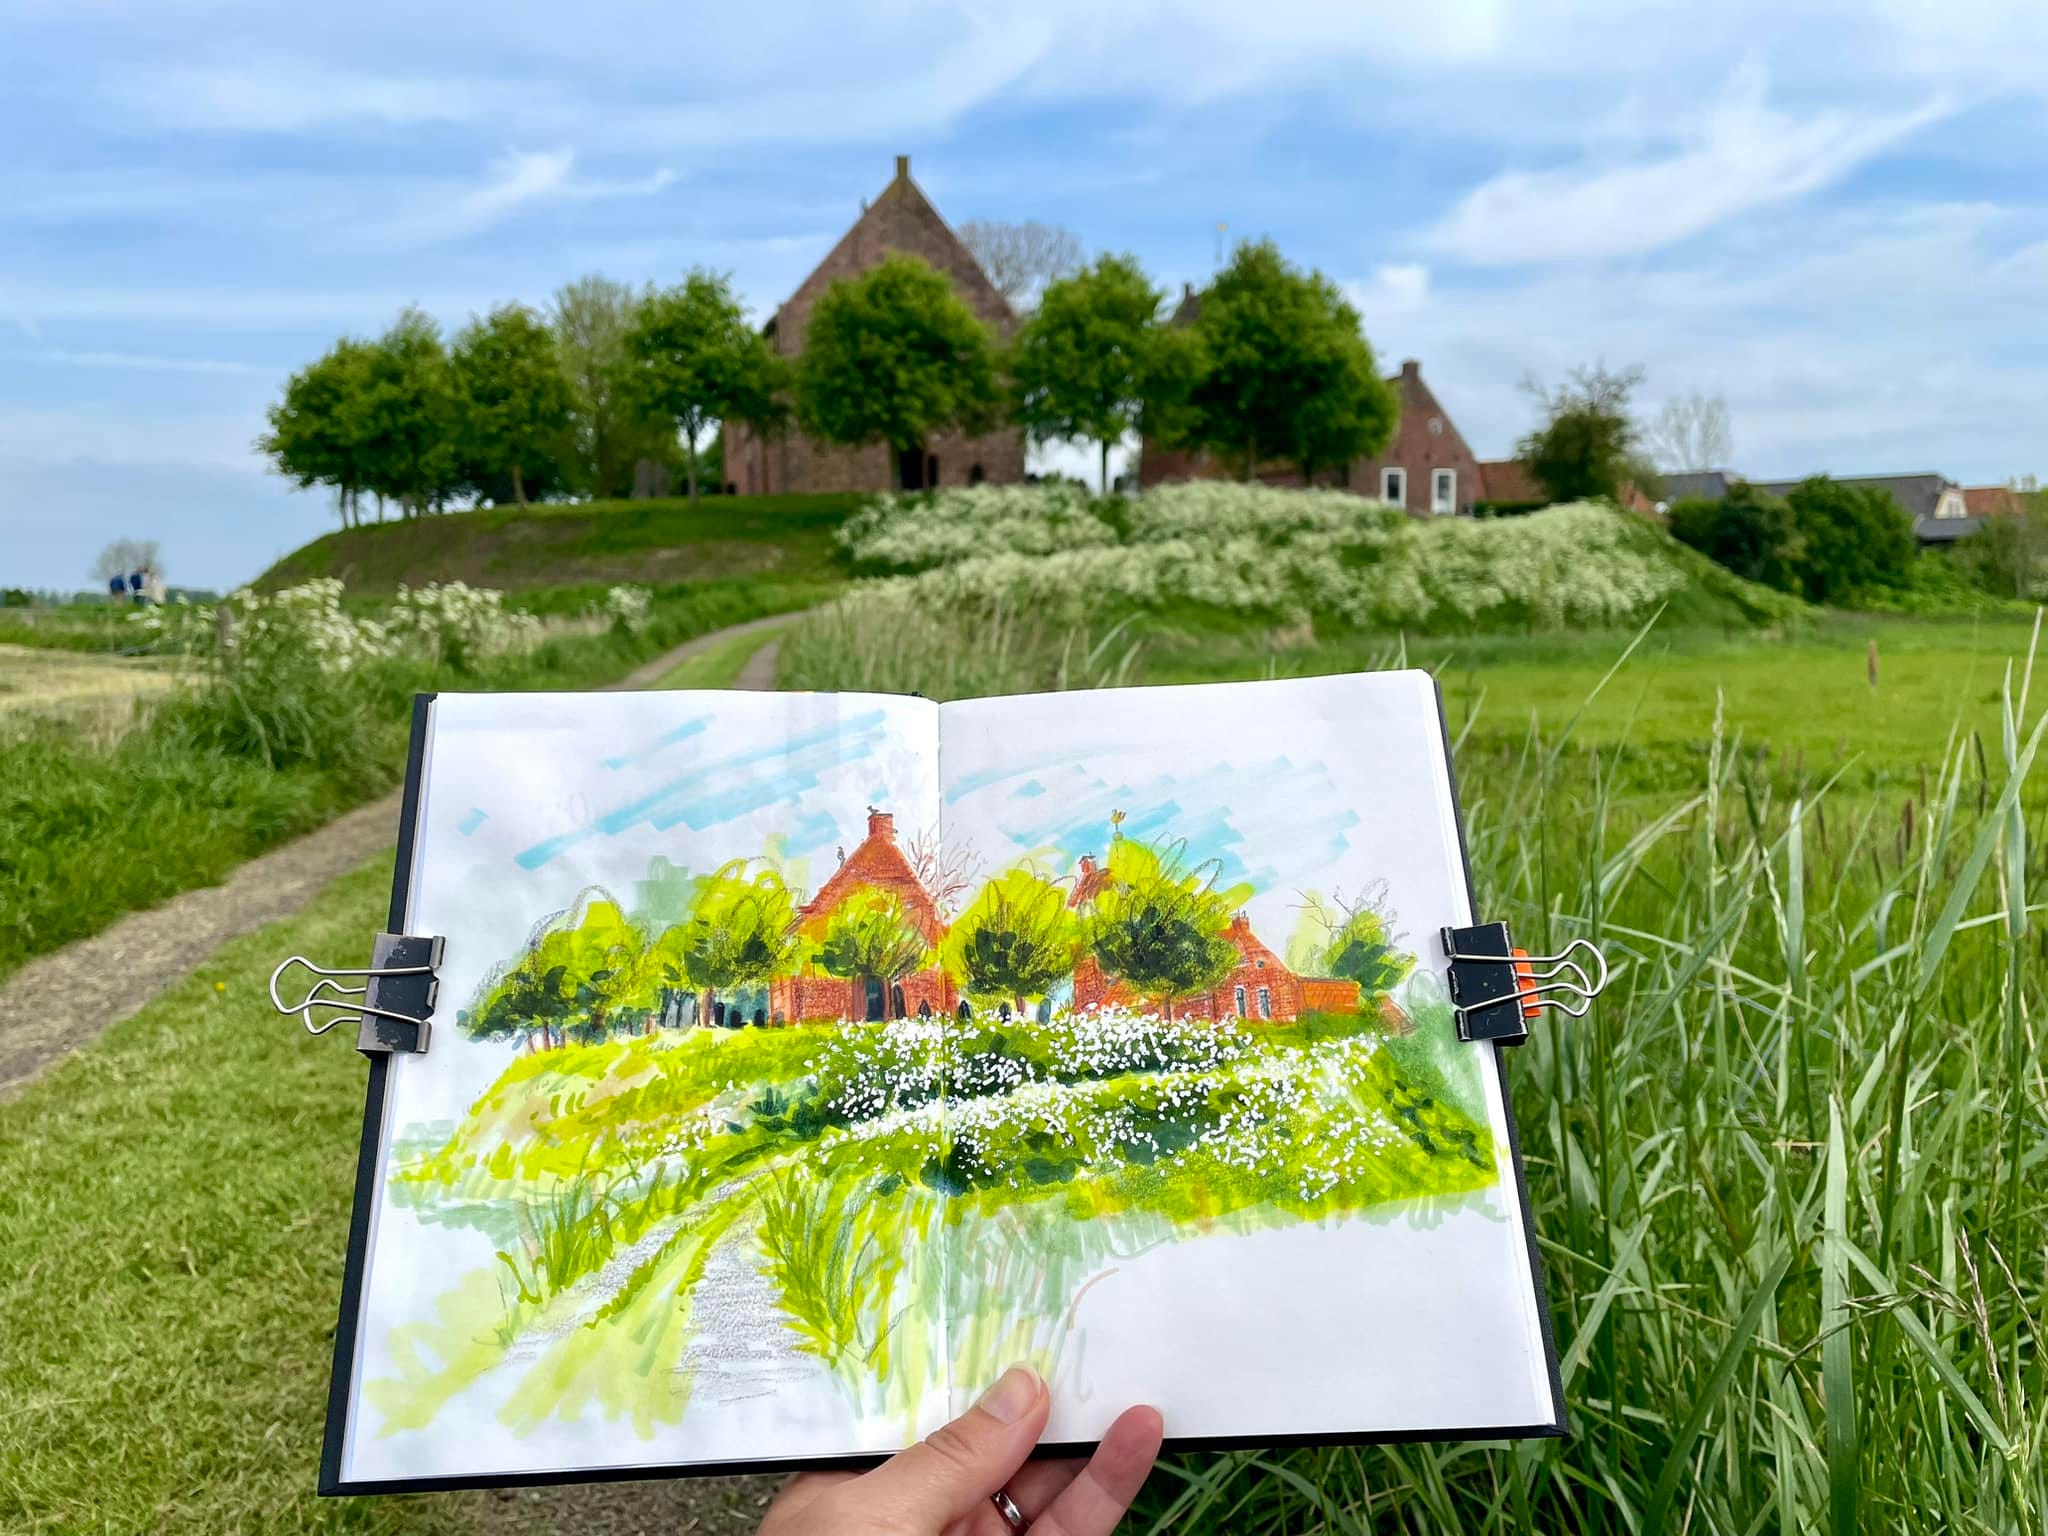
Here are some of my recent Urban sketches:


I know I will be coming back to this post, and I am sure you too! It has so many tips and tricks on how to paint on location, thanks Linda!
In the next few days, we will have the last part of this Urban Sketching series, where I will share my favorites- from courses to everything I have forgotten to mention in this series.
How are your urban sketches going this summer? Is it easier to go out now after having some inspiration around? I hope you are, and you are freeing yourself from fears and other stuff.
Until later friends,
Citla
Thank you and Linda for this post! It is so full of valuable information and advice, I had to read it twice!!
Thanks you for this, and great headline!